ngspice
One of the benefits of PCB-as-code is it avoids the tediousness of drag-and-drop GUIs. The various spice simulations often require the same drag-and-drop steps and maybe even recreating the PCB. typeCAD lets you use your code with only very minor changes.
Voltage Divider
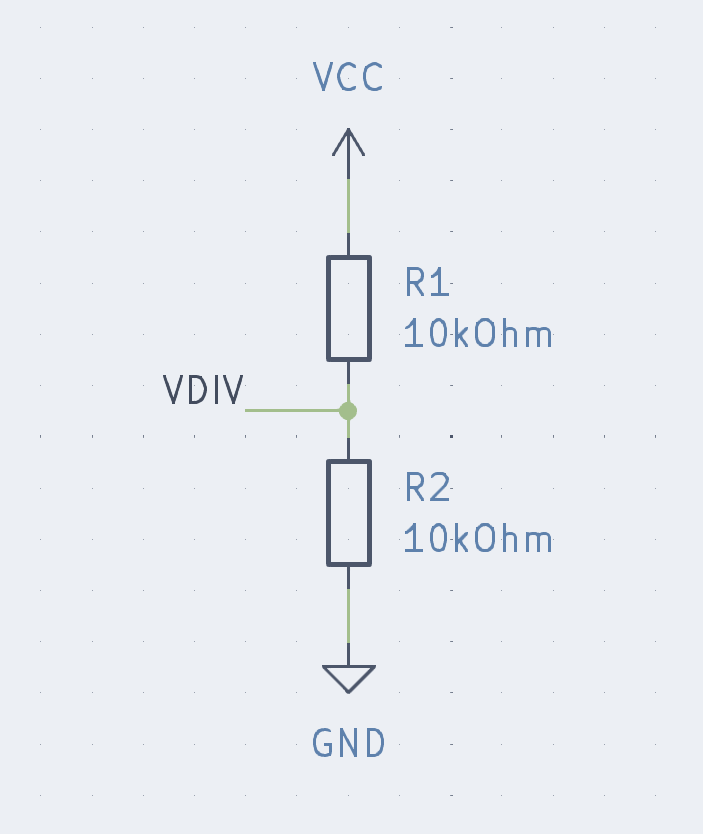
This example will use the voltage divider example as a starting point.
This is the circuit: 
And this is the code:
import { PCB } from "@typecad/typecad"
import { Resistor } from '@typecad/passives/0603';

let typecad = new PCB('voltage_divider');
let r1 = new Resistor({ value: '10kohm' });
let r2 = new Resistor({ value: '10kohm' });

typecad.named('vdiv').net(r1.pin(2), r2.pin(1));

typecad.create(r1, r2);
Install @typecad/ngspice
First, make sure you have @typecad/ngspice installed in your project. From the ./hw directory, run:
npm install @typecad/ngspiceThen you’ll need ngspice installed and ensure the binaries are in your PATH.
Power
Next, we need to add a Power component. In addition to helping with simulation, they assist with ERC (electrical rule checking) by ensuring pins are connected as they should be and packages can use it to determine the power supply voltage is correct.
import { PCB } from "@typecad/typecad"
import { PCB, Power } from "@typecad/typecad"
import { Resistor } from '@typecad/passives/0603';

let typecad = new PCB('voltage_divider');
let r1 = new Resistor({ value: '10kohm' });
let r2 = new Resistor({ value: '10kohm' });
let vin = new Power({ power: r1.pin(1), gnd: r2.pin(2), voltage: 3.3 });

typecad.named('in').net(r1.pin(1));
typecad.named('vdiv').net(r1.pin(2), r2.pin(1));
typecad.named('gnd').net(r2.pin(2));

typecad.create(r1, r2);
In the code above, we added a Power object called vin. Power is coming in from the top of R1 and going to the bottom of R2. The voltage is 3.3 volts.
A more practical example would be a battery holder with the pins corresponding to the positive and negative terminals, but for this example, we’ll use the resistor legs as the power terminals.
Power objects represent a physical component like the pins of a battery holder or a voltage regulator. It is not the same as a PCB VCC or GND symbol that is more abstract.
Look at lines 10 and 12. You’ll see that vin.power is connected to r1.pin(1) by itself and it is ::named. @typecad/ngspice only pays attention to ::named nets that have components used in the simulation. nspice will treat each ::named net as a node and give voltage/power/current measurements for each.
Import ngspice
Now we need to add the ngspice related code.
import { PCB, Power } from "@typecad/typecad"
import { Resistor } from '@typecad/passives/0603';
import { ngspiceSimulator } from '@typecad/ngspice';

let typecad = new PCB('voltage_divider');
let r1 = new Resistor({ value: '10kohm', simulation: { include: true } });
let r2 = new Resistor({ value: '10kohm', simulation: { include: true } });
let vin = new Power({ power: r1.pin(1), gnd: r2.pin(2), voltage: 3.3 });
let ngspice = new ngspiceSimulator(typecad, vin);

typecad.named('vdiv').net(r1.pin(2), r2.pin(1));

typecad.create(r1, r2);
This code imports the package. It also adds a simulation property to the resistors. This tells @typecad/ngspice to include the component in the simulation. Every component has a simulation property, setting include to true will include the component in the simulation. There is an additional property, model, that can be used to specify an ngspice model: {model: '.model Dled D (IS=1a RS=3.3 N=1.8)'.
The last thing is to create a ngspiceSimulator object. It takes the PCB object and all the Power objects. In this example, we only have one Power object, but if you have multiple, you can pass them all.
Simulate
Now that our circuit is created, nets are named, we can run the simulation.
Currently, there are two simulation modes available in the library: DC and transient analysis.
import { PCB, Power } from "@typecad/typecad"
import { Resistor } from '@typecad/passives/0603';
import { ngspiceSimulator } from '@typecad/ngspice';

let typecad = new PCB('voltage_divider');
let r1 = new Resistor({ value: '10kohm', simulation: { include: true } });
let r2 = new Resistor({ value: '10kohm', simulation: { include: true } });
let vin = new Power({ power: r1.pin(1), gnd: r2.pin(2), voltage: 3.3 });
let ngspice = new ngspiceSimulator(typecad, vin);

typecad.named('vdiv').net(r1.pin(2), r2.pin(1));

typecad.create(r1, r2);

ngspice.op();
When the project is built, the output will be in the console:
🌶️ Running ngspice
┌────────────────────┬───────────────┬────────────────────┐
│ Variable           │ Type          │ Value              │
├────────────────────┼───────────────┼────────────────────┤
│ r1:power           │ power         │ 2.7225 mW          │
├────────────────────┼───────────────┼────────────────────┤
│ v(in)              │ voltage       │ 3.3000 V           │
├────────────────────┼───────────────┼────────────────────┤
│ i(r1)              │ current       │ 1.6500 mA          │
├────────────────────┼───────────────┼────────────────────┤
│ i(r2)              │ current       │ 1.6500 mA          │
├────────────────────┼───────────────┼────────────────────┤
│ r2:power           │ power         │ 2.7225 mW          │
├────────────────────┼───────────────┼────────────────────┤
│ i(v1)              │ current       │ -1.6500 mA         │
├────────────────────┼───────────────┼────────────────────┤
│ v(vdiv)            │ voltage       │ 1.6500 V           │
└────────────────────┴───────────────┴────────────────────┘
Each node will be displayed with calculated voltage. ngspice doesn’t list ground nodes. Each included component will be displayed with power and current. The final bit will be information about the power supply. In this example, v1 supplies 1.65 mA of current to the circuit.
Transient
This example won’t show any variance, but you can run a transient analysis.
Add ngspice.tran('1us', '100ms'); to the end of the file and ngspice’s graphing windows will open for all the nodes and components when the project is built. tran takes all the same arguments as ngspice’s tran command, as described in the ngspice documentation, section 11.3.10.
Continuing development
This package covers the basic functionality of basic components. Future development will include the ability to use ngspice library files, additional power source options, and more analysis types.