
Make a Voltage Divider in typeCAD
In this example, we will make a voltage divider.
This is the equivalent circuit: 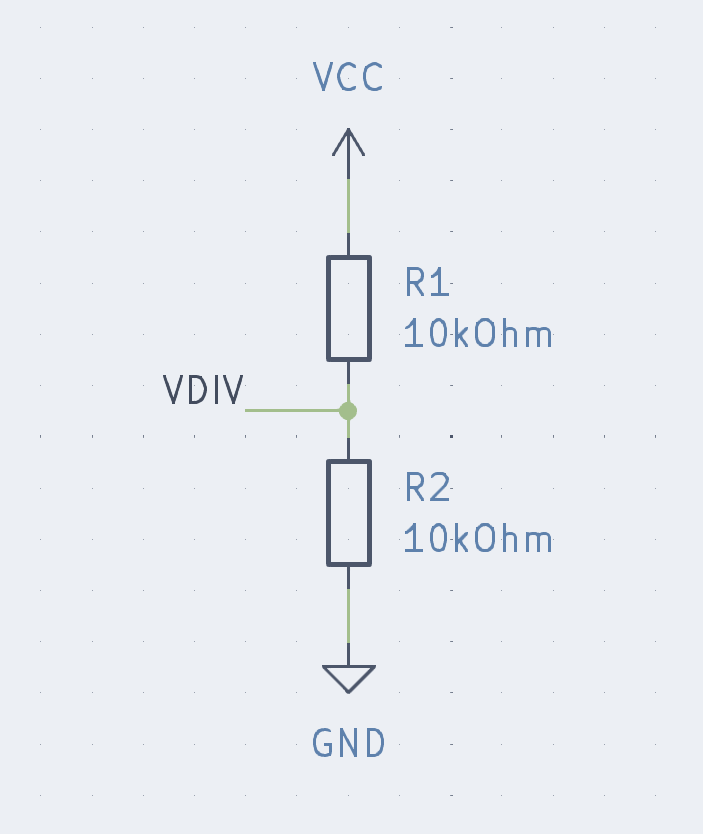
Very simple, just two resistors. Voltage on the top, ground on the bottom, with half the voltage in the middle.
Video
Make a typeCAD project
From a terminal, run:
typecad createCall this project voltage_divider. No need to make a PlatformIO project or initialize a git repo unless you want to. No extra packages are needed either, but feel free to add them later if you want.
Like the output said, open voltage_divider.code-workspace in VSCode to get started. You should see NPM Scripts in the sidebar with a few scripts. If you don’t, click View > Open View > and enter NPM Scripts.
Test build
Click the 🤖 Build script and you should see some build output in a terminal. If everything is installed correctly, you should be able to build the project without any errors.
The r1 resistor is there as test code. It, and the rest of the code, is contained in ./src/voltage-divider.ts.
Making resistors
You can delete most of the starter code in voltage_divider.ts so you’re left with this:
import { PCB } from '@typecad/typecad'
import { Resistor } from '@typecad/passives/0603';

let typecad = new PCB('voltage_divider');
let r1 = new Resistor({ value: '1kohm' });

typecad.create(r1);
This code creates a PCB object called typecad and a Resistor object called r1. We need two resistors, so let’s make another.
import { PCB } from '@typecad/typecad'
import { Resistor } from '@typecad/passives/0603';

let typecad = new PCB('voltage_divider');
let r1 = new Resistor({ value: '1kohm' });
let r2 = new Resistor({ value: '1kohm' });

typecad.create(r1, r2);
Don’t forget to add r2 to the create method.
@typecad/passives
Most passives can be added in this way. For all the documentation, visit the package page. Resistors, capacitors, inductors, fuses, diodes and LEDs in various sizes can be made this way. Connectors and testpoints are also in the package.
Resistor properties
Components have several properties, the one we’re concerned with here is value (VSCode tooltips will tell you all the other properties). Our example schematic used 10kOhm resistors, so let’s change that.
import { PCB } from '@typecad/typecad'
import { Resistor } from '@typecad/passives/0603';

let typecad = new PCB('voltage_divider');
let r1 = new Resistor({ value: '10kohm' });
let r2 = new Resistor({ value: '10kohm' });

typecad.create(r1, r2);
Build
Build the schematic again. Click the open_board script. When KiCAD opens you should see two resistors on the board.
To see the changes in your code in KiCAD, use the Revert menu item in File. You may want to hotkey this function since you’ll be using it a lot with typeCAD.
Connections
To create our voltage divider, we need to connect our two resistors together.
import { PCB } from '@typecad/typecad'
import { Resistor } from '@typecad/passives/0603';

let typecad = new PCB('voltage_divider');
let r1 = new Resistor({ value: '10kohm' });
let r2 = new Resistor({ value: '10kohm' });

typecad.net(r1.pin(2), r2.pin(1));

typecad.create(r1, r2);
If we want, we can give this connection a name so it is clearer in KiCAD.
typecad.net(r1.pin(2), r2.pin(1));
typecad.named('vdiv').net(r1.pin(2), r2.pin(1));
Build again
When you build again, you’ll see the connection we just made inside KiCAD.
Power
We need to add a power source to make something happen. A Power object represents a physical source of power in typeCAD. Don’t think of it like the VCC or GND symbol in a schematic, but more like a power regulator or battery as it would be in your PCB; it has pins and is an actual component. For this simple example, the pins will be the top of R1 and the bottom of R2.
import { PCB, Power } from "@typecad/typecad"
import { Resistor } from '@typecad/passives/0603';

let typecad = new PCB('voltage_divider');
let r1 = new Resistor({ value: '10kohm' });
let r2 = new Resistor({ value: '10kohm' });
let vcc = new Power({ power: r1.pin(1), gnd: r2.pin(2), voltage: 5.0 });

typecad.named('vdiv').net(r1.pin(2), r2.pin(1));

typecad.create(r1, r2);
There won’t be anything to see after this change from with KiCAD, but the schematic will have a VCC, GND and power flags.